Build your first IoT Application
Whether you are a Startup, Maker or a hobbyist you can use our API's to build IoT products on Embedded Devices.
This is a high level overview of Shunya Interfaces features. Click to interact with the image (it has direct links to our documentation).
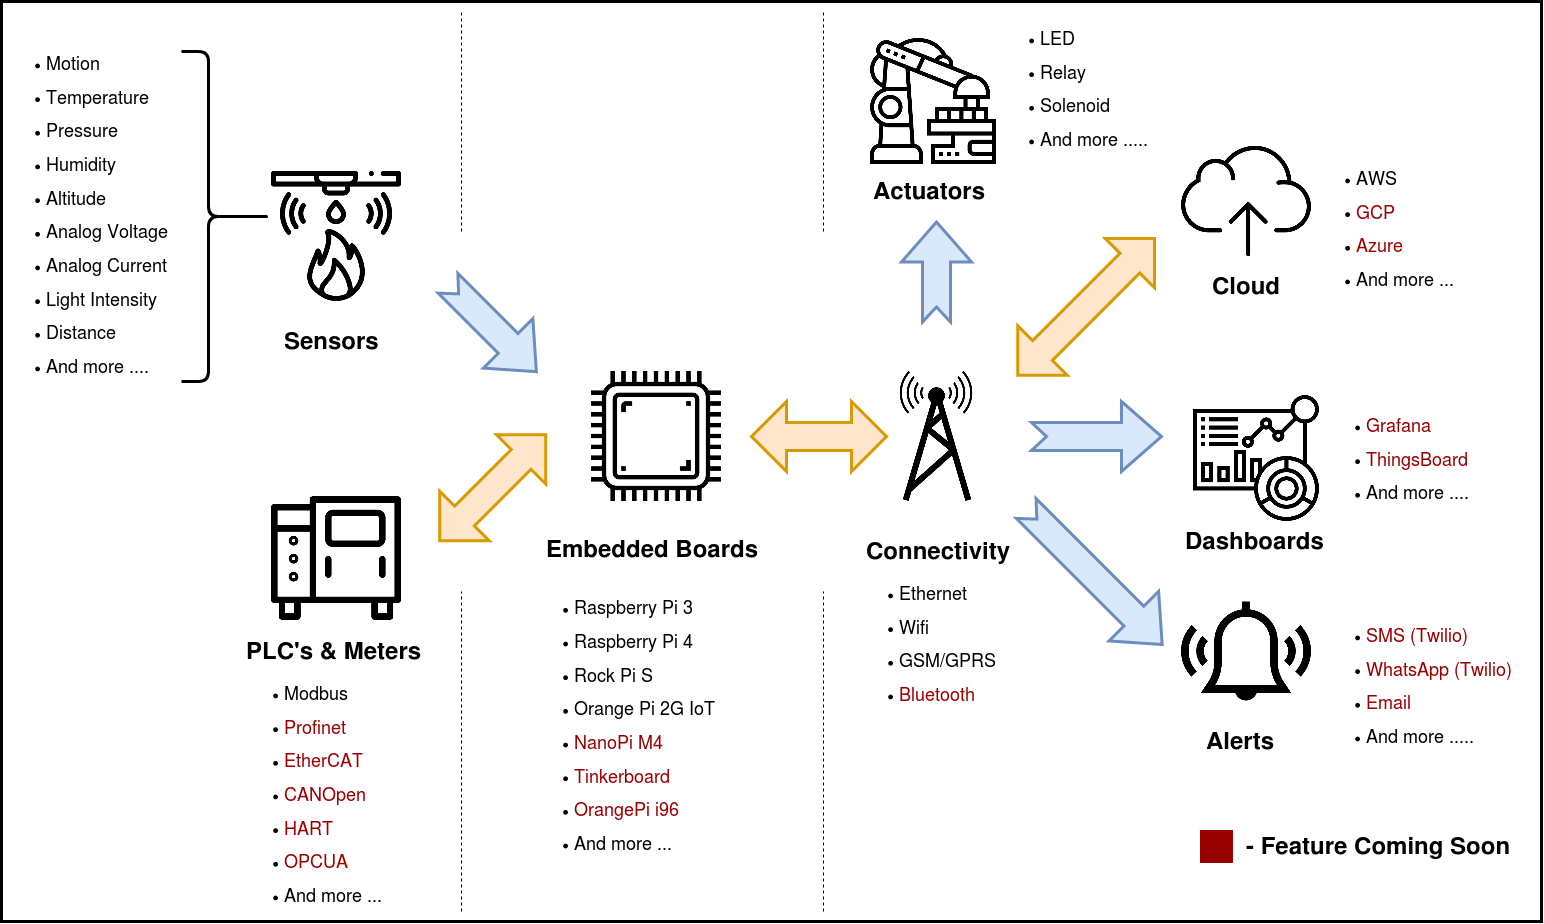
Step 1: Select Sensors, Actuators and Insight tools
Use the basic structure as a start point and Paste code accordingly.
- C/CPP
/*Include this header file into your program */#include <shunyaInterfaces.h>
/* Main Function */int main(void) { /* Initialize the Library*/ initLib();
/*#################################### * PASTE CODE BELOW *####################################*/
return 0;}Choose Sensors (Gather data)
- Voltage
- Distance
- Light Intensity
- Current
- Liquid Flow
- Gas (coming soon)
- Pressure (coming soon)
- Humidity (coming soon)
- Motion (coming soon)
- Temperature (coming soon)
Choose Insight tools
- Send Data to Cloud (AWS)
- Send Data to Dashboard (coming soon)
Choose to send Alerts
- Send Alerts via Mail (coming soon)
- Send Alerts via Messages (coming soon)
- Send Alerts via WhatsApp messages (coming soon)
Choose Actuators (Hardware Actions)
Step 2: Connect peripherals & Configure Shunya Interfaces
Choose a dev Board
Shunya Interfaces supports these development boards, you can choose any one of them to work with.
- RockPi-S-V10
- Raspberry Pi 4
- Raspberry Pi 3
- OrangePi 2G IOT
Connect peripherals
Connect all your hardware peripherals to the board.
To help you with the connections use the links in the excel to easily find pinouts for the development boards.
Configure Shunya Interfaces
Tell Shunya Interfaces your hardware connections.
You can configure by running command.
$ sudo vi /etc/shunya/interfaces/config.yamlSensor ID's and Connection ID's
You tell all your Hardware connections to Shunya Interfaces via Sensor ID's and Connection ID's.
Each Sensor is given a special ID which the Shunya Interfaces library recognizes. And each Hardware pin on the Sensor is given a Connection ID.
So when we write pin 1: 1.1 Shunya Interfaces understands it as <Sensor 1>.<Sensor pin 1> connected to pin 1 of Raspberry Pi.
For Example : Let's say that, we have connected 2 devices to the Raspberry Pi (BME280 and PCF8591) to pin 3 (SDA) & pin 5 (SCL) respectively.
Our Config file will look like.
pin 3: [1.1, 6.1]pin 4: nullpin 5: [1.2, 6.2]Make sure to save your changes to the config file.
Step 3: Install Shunya OS
Shunya Interfaces is built on top of Shunya OS and comes pre-installed with Shunya Interfaces. Shunya OS is an linux-based OS that runs on your hardware, it light-weight and configurable.
What will you need.
- Chosen board and its peripherals
- microSD card Reader/Adapter and microSD card
- Laptop/PC
Install Etcher
Etcher allows you to Flash Shunya OS on the micro-SD card.
- Windows
- Ubuntu
For Ubuntu 16.04
Installing Etcher is Simple, just run few commands in the terminal
$ sudo apt update$ sudo apt install balena-etcher-electronFlash Shunya OS
- Download Shunya OS
- Right click on the downloaded zip file.
- Click Extract here.
- Open Etcher.
- Click Select Image.
- You will find the Shunya OS
.imgfile in the folder that we had extracted earlier. - Select
shunya-aaaa-image-xxxx.imgfile. - Insert SD card.
- Click on Flash.
This will load the micro-SD card with Shunya OS.
Booting Up with Shunya OS
- Insert the micro-SD card into the board.
- Connect peripherals like Keyboard, Mouse and HDMI monitor.
- Connect Power Supply.
The board should boot up with Shunya OS.
Login to Shunya
Login with these credentials:
- Username : shunya
- Password : shunya
Step 4: Run your program
Compile code and Run the program.
- C/CPP
$ gcc -o myapp program.c -lshunyaInterfaces_user -lshunyaInterfaces_core$ sudo ./myapp