Farm Datalogger
The demo can be used to Monitor critical parameters which decide the health of the crops, Display the data on a Dashboard using Grafana.
What will you need?
- Raspberry Pi 3/4 (or any variant of these)
- mcro-SD card and micro-SD card Reader/Adapter.
- Temperature, Pressure sensor - BME280
- Soil Moisture sensor
- Analog to Digital Converter - PCF8591 module
- OLED Display (128x64) (optional)
- Female to Female Du-point cables
- Laptop or Server Installed with Influxdb and Grafana
Steps
Make your own Farm datalogger following these steps.
- Install Shunya OS
- Write Code
- Connect Hardware
- Compile and Run
Step 1: Install Shunya OS
Shunya Interfaces is built on top of Shunya OS and comes pre-installed with Shunya Interfaces. Shunya OS is an linux-based OS that runs on your hardware, it light-weight and configurable.
Install Etcher
Etcher allows you to Flash Shunya OS on the micro-SD card.
- Windows
- Ubuntu
For Ubuntu 16.04
Installing Etcher is Simple, just run few commands in the terminal
$ sudo apt update$ sudo apt install balena-etcher-electronFlash Shunya OS
- Download Shunya OS
- Right click on the downloaded zip file.
- Click Extract here.
- Open Etcher.
- Click Select Image.
- You will find the Shunya OS
.imgfile in the folder that we had extracted earlier. - Select
shunya-aaaa-image-xxxx.imgfile. - Insert SD card.
- Click on Flash.
This will load the micro-SD card with Shunya OS.
Booting Up with Shunya OS
- Insert the micro-SD card into the board.
- Connect peripherals like Keyboard, Mouse and HDMI monitor.
- Connect Power Supply.
The board should boot up with Shunya OS.
Login to Shunya
Login with these credentials:
- Username : shunya
- Password : shunya
Step 2: Lets code!
Open up your editor on Shunya OS and lets start coding.
Our application must be able to
- Read Temperature
- Read Pressure
- Read Soil Moisture
- Send it to Dashboard
- Repeat 1-4 after 10 minutes
Basic structure of Shunya Interfaces
Use the basic structure as a reference and Paste code into the structure as per your app logic.
- C/CPP
/*Include this header file into your program */#include <shunyaInterfaces.h>
/* Main Function */int main(void) { /* Initialize the Library*/ initLib();
/*#################################### * PASTE CODE BELOW *####################################*/
return 0;}API for reading Temperature from the sensor is
- C/CPP
/* Add this line to your main function * to read data from the sensor */float temp = getCelsius();API for reading Pressure from the sensor is
- C/CPP
/* Add this line to your main function * to read data from the sensor */float pressure = getPa();API for reading Soil moisture from the sensor is
- C/CPP
/* Add this line to your main function * to read data from the sensor */int moisture = getAdc(1);Send the Data to Dashboard
- C/CPP
/*Include this header file into your program */#include <curl/curl.h>
#define DASBOARD_IP_ADDR "192.168.0.109"#define DB_NAME "foo_farm"
/* Add these line to your main function */sprintf (&buf, "measurement,host=sensor value=%.2f", temp);sendToDashboard(buf);warning
Summary
Your Code should look something like this.
- C/CPP
#include <stdlib.h>#include <stdio.h>
#include <shunyaInterfaces.h>#include <simple-mode.h>#include <functions.h>
#define DASBOARD_IP_ADDR "192.168.0.109"#define DB_NAME "foo_farm"
int sendToDashboard(char *msg) { CURL *curl; CURLcode res; char addr[1024]; sprintf (&addr, "http://%s:8086/write?db=%s", DASBOARD_IP_ADDR, DB_NAME); curl = curl_easy_init(); if(curl) { curl_easy_setopt(curl, CURLOPT_URL, addr); curl_easy_setopt(curl, CURLOPT_POSTFIELDS, msg); res = curl_easy_perform(curl); if(res != CURLE_OK) fprintf(stderr, "curl_easy_perform failed: %s\n", curl_easy_strerror(res)); curl_easy_cleanup(curl); } curl_global_cleanup(); return 0;}
void main(void){ char buf[36];
/*Initialize Shunya Interfaces library*/ initLib(); while (1) { /* Read data from the sensor */ float temp = getCelsius(); float pressure = getPa(); int moisture = getAdc(1); char buf[128]; /* Send data to dashboard */ sprintf (&buf, "temperature,host=bme280 temp=%.2f", temp); sendToDashboard(buf); sprintf (&buf, "pressure,host=bme280 pressure=%.2f", pressure); sendToDashboard(buf); sprintf (&buf, "soil.moisture,host=pcf8591 moisture=%.2f", moisture); sendToDashboard(buf);
delay(10*60*1000); }}Step 3: Connect Hardware
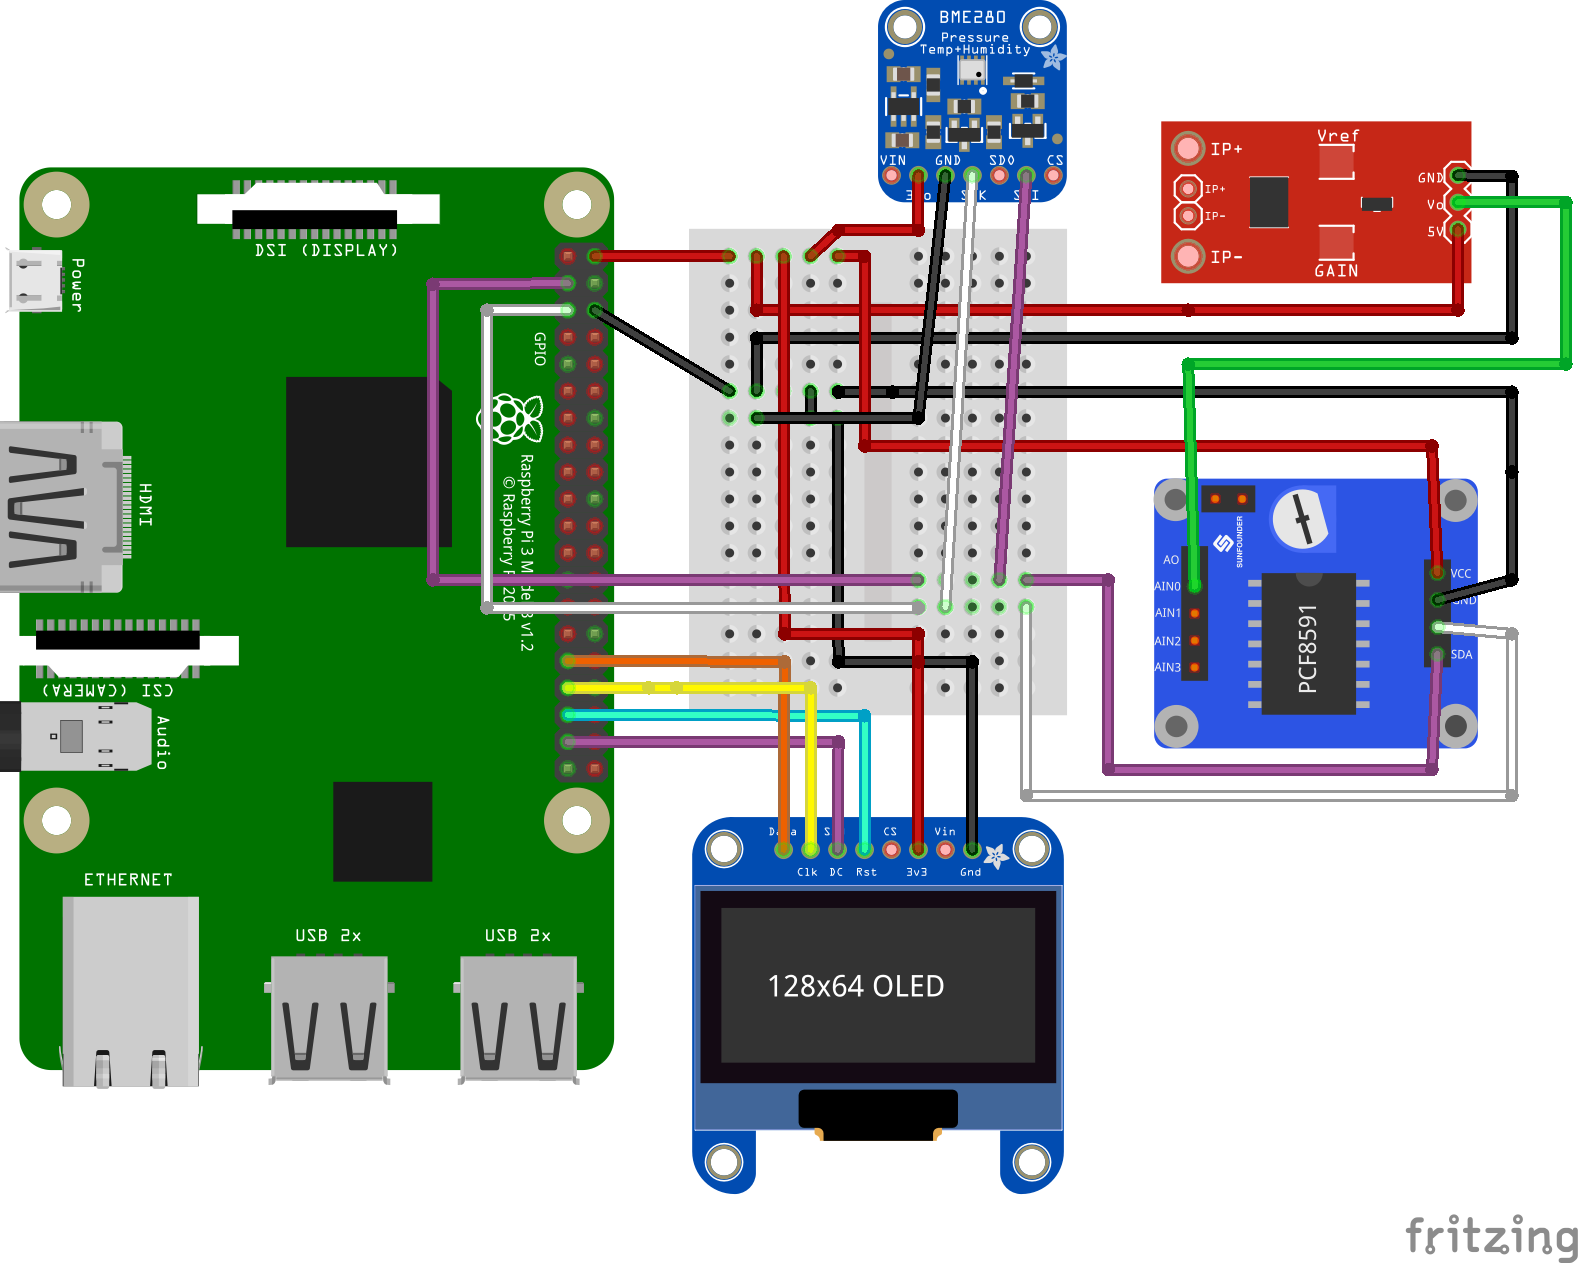
Now its time to put all the hardware together, use the diagram below to connect hardware.
Step 4: Configure, Compile and Run
Configure
Tell Shunya Interfaces your hardware connections.
You can configure by running command.
$ sudo vi /etc/shunya/interfaces/config.yamlSensor ID's and Connection ID's
You tell all your Hardware connections to Shunya Interfaces via Sensor ID's and Connection ID's.
Each Sensor is given a special ID which the Shunya Interfaces library recognizes. And each Hardware pin on the Sensor is given a Connection ID.
So when we write pin 1: 1.1 Shunya Interfaces understands it as <Sensor 1>.<Sensor pin 1> connected to pin 1 of Raspberry Pi.
In our case, we have connected 2 devices to the Raspberry Pi (BME280 and PCF8591) to pin 3 (SDA) & pin 5 (SCL) respectively.
Our Config file will look like.
pin 3: [1.1, 6.1]pin 4: nullpin 5: [1.2, 6.2]Make sure to save your changes to the config file.
Compile and Run
Compiling code is same as compiling C program. Just link the libraries.
tip
While running the code use sudo to give appropriate permissions to your app.
$ gcc -o iotfarm iotfarm.c -lshunyaInterfaces_user -lshunyaInterfaces_core -lcurl$ sudo ./iotfarmNow your IoT device is ready and publishing data to the server.
Step 5: Create Dashboards
Now that the IoT app is up and running, configure Grafana to create Beautiful Dashboards for you.
Grafana provides amazing guides for users to configure Grafana, take a look at them.
Want to Build your own Application?
Click on the Next button, below.