Face Recognition

The demo can be used to register and recognize a face of a person on edge device with ShunyaFace APIs.
face-recog-png

Source

What will you need?

  1. Raspberry Pi 3/4 (or any variant of these)
  2. micro-SD card and micro-SD card Reader/Adapter.
  3. USB Camera
  4. Laptop

Steps

Make your own Face-Recognition Application following these steps.

  1. Install Shunya OS
  2. Write Code
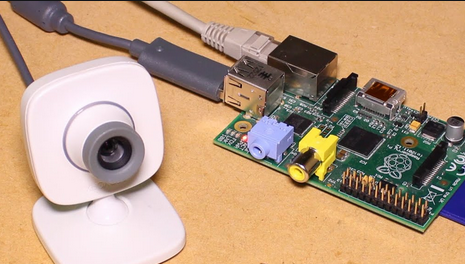
  3. Connect Camera to Hardware
  4. Compile and Run

Step 1: Install Shunya OS

Shunya Face is built on top of Shunya OS and comes pre-installed with Shunya Face package. Shunya OS is an linux-based OS that runs on your hardware, it light-weight and configurable.

Install Etcher

Etcher allows you to Flash Shunya OS on the micro-SD card.

For Ubuntu 16.04

Installing Etcher is Simple, just run few commands in the terminal

  1. Download balenaEtcher for Linux 64bit (depends on your system).
  2. Extract the zip file
  3. Open terminal in the same location where the file is extracted and run this command
./balenaEtcher-1.5.100-x64.AppImage

It will open Etcher window in front of you

Flash Shunya OS

  1. Download Shunya OS
  2. Right click on the downloaded zip file.
  3. Click Extract here.
  4. Open Etcher (with the comment give above)
  5. Click Select Image.
  6. You will find the Shunya OS .img file in the folder that we had extracted earlier.
  7. Select shunya-aaaa-image-xxxx.img file.
  8. Insert SD card.
  9. Click on Flash.
install-shunya-os-gif

This will load the micro-SD card with Shunya OS.

Booting Up with Shunya OS

  1. Insert the micro-SD card into the board.
  2. Connect peripherals like Keyboard, Mouse and HDMI monitor.
  3. Connect Power Supply.

The board should boot up with Shunya OS.

Login to Shunya

Login with these credentials:

  • Username : shunya
  • Password : shunya

Step 2: Lets code!

Open up your editor on Shunya OS and lets start coding.

Our application must be able to

  1. Capture a face from camera feed
  2. Detect Face from the frame
  3. Get Embeddings of a detected Face
  4. Store Embeddings in the database
  5. Take different frame of same person and recognize the face
  6. Display Recognized Person name in the terminal

Basic structure of Shunya Face

Use the basic structure as a reference and Paste code into the structure as per your app logic.

/*Include this header file into your program */
#include <ai/shunyaface.h>
using namespace cv;
using namespace std;
/* Main Function */
int main(int argc, char *argv[]) {
/*####################################
* PASTE CODE HERE
*####################################*/
return 0;
}

Lets read frame with opencv

/* Add opencv headerfile */
#include <opencv2/opencv.hpp>
/* Add this line to your main function
* to read continuos frames from camera */
Mat frame;
VideoCapture cap;
if(!cap.open(0))
return 0;
for(;;)
{
cap >> frame;
if( frame.empty() ) break; // end of video stream
if( waitKey(10) == 27 ) break; // stop capturing by pressing ESC
}

API to detect faces from the given frame

/* Add this line to your main function inside for loop
* to detect a face captured from opencv */
vector<FaceInfo> detFaces;
detFaces = detectFace(frame);
if (detFaces.size() > 0) {
cout<<"Face Detected!"<<endl;
}
else {
cout<<"No face detected!"<<endl
}

API to align the detected face

/* Add these line to your main function if the number of detected faces > 1 */
/* We are passing first detected face to alignFace function i.e. detFaces[0] */
face = alignFace(frame, detFaces[0]);

API to get embeddings for aligned face

/* Add these line to your main function which gives 128D array of embeddings for a face */
vector<float> embeddings;
embeddings = getEmbeddings(face);

API to store the face embeddings with the person name in database

#define DATABASE "./db.txt"
/* Add these line to your main function if you want to store a face in database*/
string name;
if (argc > 1) {
/* Taking name from user */
name = argv[1];
int a = storeFace(embeddings,name,DATABASE);
}

API to find the person name from his face embeddings

/* Add these line to your main function*/
string name;
name = findFace(embeddings, DATABASE );

Summary

Your Code should look something like this.

#include <iostream>
#include <vector>
#include <opencv2/opencv.hpp>
#include <fstream>
#include <cstring>
#include <ai/shunyaface.h>
#define DATABASE "db.txt"
using namespace cv;
using namespace std;
void usage () {
fprintf(stderr, "usage: facedemo");
fprintf(stderr, " : Recognizes face stored in the database file.");
fprintf(stderr, "usage: facedemo [name]");
fprintf(stderr, " : Stores face into the database");
fprintf(stderr, " name: name for storing into the face database.");
}
int main(int argc, char *argv[])
{
/* Variable to Store frame */
Mat frame;
VideoCapture cap;
if (!cap.open(0))
return 0;
/* Print Usage once regardless of the correct or incorrect usage*/
usage();
for (;;) {
cap >> frame;
if ( frame.empty() ) break; // end of video stream
if ( waitKey(10) == 27 ) break; // stop capturing by pressing ESC
/* Initialize the variables */
vector<FaceInfo> detFaces;
vector<float> embeddings;
Mat face;
string name;
if (! frame.data ) { // Check for invalid input
cout <<"Could not open or find the image" << std::endl ;
return -1;
}
/* Detect the face */
detFaces = detectFace(frame);
/* Check if faces are detected or not */
if (detFaces.size() > 0) {
cout<<"Face Detected!"<<endl;
/* Align Face */
face = alignFace(frame, detFaces[0]);
/*Get embeddings from face*/
embeddings = getEmbeddings(face);
/* Store face in database */
/* While storing the Face user is expected to enter name in command line arguments */
if (argc > 1) {
name = argv[1];
int a = storeFace(embeddings,name,DATABASE);
if (1 == a) {
cout<<"Face is stored successfully";
break;
} else {
cout<<"There is some problem with storing face";
break;
}
} else {
cout<<"\nPlease enter your name as first argument.";
break;
}
/* Find face from the database.*/
name = findFace(embeddings, DATABASE );
if (name.compare("NULL") != 0) {
cout<<"Face Recognized: "<<name<<endl;
} else {
cout<<"No Face Recognized!"<<endl;
}
} else {
cout<<"No Face Detected!!\n";
}
}
return 0;
}

Step 3: Connect USB camera to RPI

Oops!, No Image to display.

Step 4: Compile and Run

Compile and Run

  1. Clone code from the repository
$ git clone https://github.com/shunyaos/shunyaface-demo.git
$ cd shunyaface-demo

Compile the program. Run following commands.

$ mkdir build
$ cd build && cmake ..
$ make -j4

This will build the program and make it into a binary executable.

Now Lets run it.

# To recognize a face
./facedemo
# To store a face
# ./facedemo "Sneha"

You will see "Face Recognized: YourName" if your face embeddings are in database, else it will say "No face recognized".

Want to Build your own Application?

Click on the Next button, below.